		// make pdf
	    byte[] pdfOutput = makePdf();
	    os.write(pdfOutput);
	    os.close();

	    //pdf encryption
	    PDDocument pdd = PDDocument.load(os.toByteArray());
	    AccessPermission ap = new AccessPermission();
	    StandardProtectionPolicy stpp = new StandardProtectionPolicy(password, password, ap);
	    stpp.setEncryptionKeyLength(128);
	    stpp.setPermissions(ap);
	    pdd.protect(stpp);
	    pdd.save(os);
pdd.close();프로그래밍
- java pdf 암호화 2022.04.19
- OpenWrt 포팅1 - ipTIME A3002MESH 스펙 2022.03.05
- 리눅스가 절전 모드로 들어가면 나오지 못하는 문제 2021.04.30
- spring 특정 로그 일시 중시 2020.12.06
- nginx tomcat pfx SSL 적용 - 윈도우 2019.01.02 1
- Padavan DDNS freedns.afraid.org 설정 2018.10.23
- SSL Tomcat : PFX 인증서 적용 2018.10.02
- django gunicorn systemctl 등록 2018.09.27
- Django Nginx WSGI - Gunicorn 설정 2018.09.20 1
- SSH 접속이 20~30초 걸릴때 2018.09.18
java pdf 암호화
2022. 4. 19. 19:30
OpenWrt 포팅1 - ipTIME A3002MESH 스펙
2022. 3. 5. 11:07
참고 사이트 : https://mans0n.github.io/2020/08/22/openwrt-add-new-device/
OpenWrt에 새 기기 지원 추가하기
※ 2021-09-05: v21.02.0 기준으로 업데이트 들어가기 전에 글의 목적 뭔가 그럴듯한 인트로를 적어보려고 했는데 적당한 표현이 떠오르지 않아 포기하기로 하고, 핵심만 말하자면 국내에 OpenWrt 개발
mans0n.github.io
ipTIME A3002MESH 스펙
| SOC | MEDIATEK MT7621AT(Dual, 880 MHz) | MEDIATEK MT7621AT |
| RAM | DDR3 128MB(800MHz) | winband W631GG6MB-12 |
| 플래시 | 16MB(NOR, SPI) | XMC QH128AHIG |
| 이더넷포트 | 1Gbps WANx1, 1Gbps LAN x 2 | |
| WIFI | Wi-Fi 5 (b/g/n/ac), 2.4GHz, 5GHz 4T4R | MEDIATEK MT7615DN |
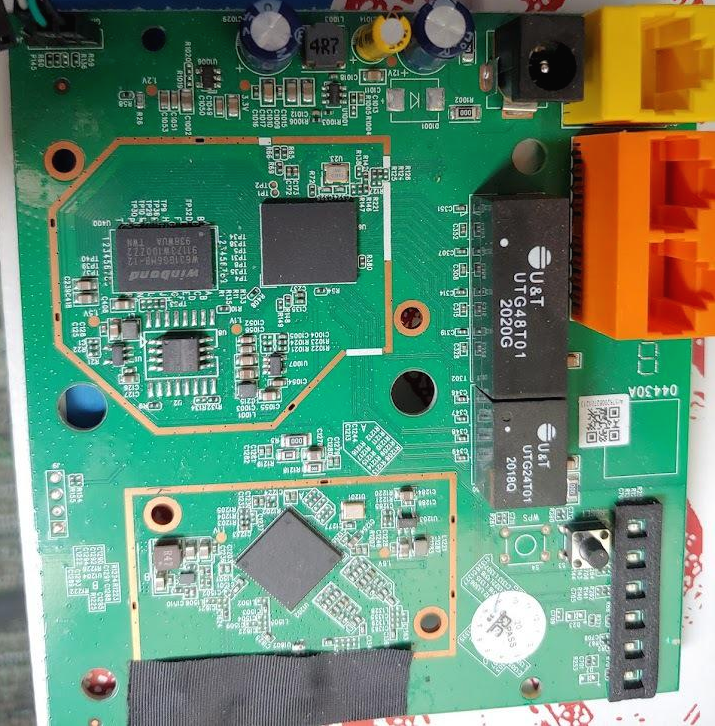

MEDIATEK
MT7621AT
2024-AMTH
CTPSKU53
DJP8H841 DTP8H841

winband SDRAM-DDR3 1Gbit(128MB) 800 MHz
W631GG6MB-12
91173WT80zz2 91173wt80zz2
938WUA twn

MEDIATEK Wi-Fi 5 (b/g/n/ac), 2.4GHz, 5GHz 4T4R 1733Mbit/s
ARM
MT7615DN
2014-BXDSL
CCMCAS95

XMC 128Mb (256 Bytes x 65535 pages) SPI - Dual/Quad I/O FLASH Non-Volatile SOP-8L NOR FLASH ROHS 2.7V ~ 3.6V
QH128AHIG
PP973100 32
1952C
UART

리눅스가 절전 모드로 들어가면 나오지 못하는 문제
2021. 4. 30. 14:20
절전 모드에서 나오지 못하고 강제 리부팅후에 /var/log/syslog 를 보니 아래의 로그가 있었다.
| pr 30 13:34:49 pc-linux systemd[1]: anacron.service: Succeeded. Apr 30 13:34:49 pc-linux systemd[1]: motd-news.service: Succeeded. Apr 30 13:34:49 pc-linux systemd[1]: Finished Message of the Day. Apr 30 13:35:30 pc-linux acpid: input device has been disconnected, fd 24 Apr 30 14:08:38 pc-linux kernel: [ 0.000000] Linux version 5.8.0-50-generic (buildd@lgw01-amd64-030) (gcc (Ubuntu 9.3.0-17ubuntu1~20.04) 9.3.0, GNU ld (GNU Binutils for Ubuntu) 2.34) #56~20.04.1-Ubuntu SMP Mon Apr 12 21:46:35 UTC 2021 (Ubuntu 5.8.0-50.56~20.04.1-generic 5.8.18) Apr 30 14:08:38 pc-linux systemd-modules-load[408]: Inserted module 'parport_pc' Apr 30 14:08:38 pc-linux kernel: [ 0.000000] Command line: BOOT_IMAGE=/boot/vmlinuz-5.8.0-50-generic root=UUID=9cff6431-fc36-40b9-b47b-a57914ef6d71 ro quiet splash crashkernel=512M-:192M Apr 30 14:08:38 pc-linux kernel: [ 0.000000] KERNEL supported cpus: Apr 30 14:08:38 pc-linux kernel: [ 0.000000] Intel GenuineIntel Apr 30 14:08:38 pc-linux kernel: [ 0.000000] AMD AuthenticAMD |
저것을 검색해보니 절전모드에서 usb 마우스 키보드가 닫혀 버리는 버그가 있다고 합니다.
그래서 해결방법은 usb를 절전모드로 들어가지 않게 하는것이라고 합니다.
해결방법은
해결방법 1 :
/etc/defaults/grub 에서 GRUB_CMDLINE_LINUX_DEFAULT 끝에
"usbcore.autosuspend=-1" 를 추가하면 됩니다.
| GRUB_CMDLINE_LINUX_DEFAULT="quiet splash usbcore.autosuspend=-1" |
그후 update-grub 를 실했시키고 재부팅합니다.
해결방법 2
| $ sudo echo "options usbcore autosuspend=-1" > /etc/modprobe.d/disable-usb-autosuspend.conf |
해당 명령어를 실행후 재부팅한다.
spring 특정 로그 일시 중시
2020. 12. 6. 19:09
import org.slf4j.LoggerFactory;
import ch.qos.logback.classic.Level;
import ch.qos.logback.classic.Logger;
import ch.qos.logback.classic.LoggerContext;


void test() {

    //resultsettable log off
    LoggerContext loggerContext = (LoggerContext)LoggerFactory.getILoggerFactory();

    loggerContext.getLogger("jdbc.resultsettable").setLevel(Level.OFF);

    examDao.selectList(...);

    loggerContext.getLogger("jdbc.resultsettable").setLevel(Level.INFO);

}nginx tomcat pfx SSL 적용 - 윈도우
2019. 1. 2. 17:04
1. pfx 파일을 crt 및 rsa로 변환 - convert pfx file to crt and rsa.
$ openssl pkcs12 -in ssl.mysite.com.pfx -clcerts -nokeys -out ssl.mysite.com.crt |
2. crt rsa파일 복사 - copy crt and rsa file to NGINX_HOME/conf/ssl/
C:\Users\fehead> dir /w C:\nginx\conf\ssl C:\nginx\conf\ssl |
3. nginx config 파일 설정 - set nginx config file.
###################################################################################################################################################### # tomcat upstream tomcat { # ssl.mysite.com https setting # ssl.mysite.com SSL redirect # Etc Site } |
4. test nginx config
C:\nginx>nginx.exe -t |
5. restart nginx
C:\nginx>nginx.exe -s reload |
Padavan DDNS freedns.afraid.org 설정
2018. 10. 23. 16:48
http://fehead.tistory.com/216 참고
1. 여기서 http://freedns.afraid.org/ FREE 동적 DNS를 먼저 구한다.
동적DNS를 무료로 사용해보자 - FreeDNS - 여기를 참고 하라.
2. freedns 에서 키값을 얻는다.
http://freedns.afraid.org/dynamic/ 에 들어가서 중앙 하단 부분에 자기가 등록한 도메인이 있을 것이고 그 아래쪽에 Direct URL 를 클릭하면 새창이 뜬다.


여기서 나온 URL부분에
빨간 상자 부분이 키 값이다.
3. Padavan 설정

고급설정 -> WAN ->DDNS 메뉴로 간다음
DDNS 클라이언트 활성화
서버 프로필을 "freedns.afraid.org" 선택
호스트에 "freedns.afraid.org"
토큰에 freedns.afraid.org 에서 얻은 키값을 넣는다.
보안 HTTPS 연결을 사용 하시겠습니까? "아니오" 선택
적용 버튼을 누른다.
끝
SSL Tomcat : PFX 인증서 적용
2018. 10. 2. 11:44
tomcat 서버설정
Server.xml을 설정합니다.
[설정방법]
< Connector port="포트번호" protocol="HTTP/1.1" SSLEnabled="true"
maxThread="150" scheme="https" secure="true"
keystoreFile="pfx파일경로" keystorePass="pfx패스워드" keystoreType="PKCS12"
clientAuth="false" sslProtocol="TLS" />
[설정예제]
< Connector port="443" protocol="HTTP/1.1" SSLEnabled="true"
maxThread="150" scheme="https" secure="true"
keystoreFile="/etc/tomcat/ssl/example.com.pfx" keystorePass="123456" keystoreType="PKCS12"
clientAuth="false" sslProtocol="TLS" />
URL : https://www.comodossl.co.kr/certificate/ssl-installation-guides/Tomcat-pfx.aspx
django gunicorn systemctl 등록
2018. 9. 27. 18:36
가상환경 설정
$ cd /my/working/dir $ virtualenv -p python3 env35 $ cd env35 $ mkdir run $ source bin/activate $ pip install django gunicorn $ django-admin startproject testproject $ cd testproject $ django-admin startapp testapp |
디렉토리 구조
/my/working/dir
|
gunicorn systemd 등록
$ sudo mkdir /run/gunicorn $ sudo chown youurUserName.yourGroup /run/gunicorn # sudo vi /etc/systemd/system/gunicorn.service [Unit] |
gunicorn 서비스 시작
$ sudo systemctrl enable gunicorn.service $ sudo systemctl start gunicorn.service |
Django Nginx WSGI - Gunicorn 설정
2018. 9. 20. 15:20
# 가상환경 설정
$ virtualenv -p python3 env35 $ cd envDjango $ mkdir run $ source bin/activate $ pip install django gunicorn $ django-admin startproject testproject $ cd testproject $ django 작업 $ cat << EOF > gunicorn_cfg.py $ gunicorn -c gunicorn_cfg.py testproject.wsgi:application $ sudo -i # apt install nginx # cd /etc/nginx/sites-available/ # cat << EOF > testproject_conf # cd ../sites-enabled/ # ln -s ../sites-available/testproject_conf # nginx -t # nginx -s reload |
아래에 링크에 자세한 설명
SSH 접속이 20~30초 걸릴때
2018. 9. 18. 18:27
/etc/ssh/sshd_config 파일를 수정하고 재시작
# /etc/ssh/sshd_config UseDNS no # 추가 # 위의것으도 안되면 GSSAPIAuthentication no # 이것추가. |
위의 방법이 안된다면..
systemd-logind.service 서비스를 재시작한다.
# systemctl restart systemd-logind.service |
그런데 이게 재시작이 안될경우가 있다
이럴때는 systemctl 데몬을 재시작한다.
# systemctl daemon-reexec |